Category Archives: Development

UnityGUI Unresponsive on iPhone Retina Displays (Updated 10/28/2010)

A tester reported that Pawns for iPhone was not working on his 4th generation iPod Touch (with Retina display.) Specifically, many of the menu buttons were very flaky, sometimes requiring multiple taps before they’d register.

After some investigation I isolated the cause [EDIT: or maybe not? See my updates at the end of the post.] It appears that UnityGUI buttons are extremely sensitive to movement of the finger, when run on retina displays. The slightest movement of the fingertip on a retina display causes the tap to be ignored. (Version info: Unity 3.0 for iPhone; non-HD build of the game.)

I believe the problem is with Unity’s translation of touches into “clicks”. There is a movement threshold value (probably 5 to 10 pixels) beyond which a touch is no longer treated as a single tap on a Button. I believe Unity is using the same threshold value on retina displays, and that threshold is too low for the higher-resolution.

If I’m right, anyone shipping an iPhone game that relies on normal UnityGUI click logic is taking a serious risk at the moment. If you are getting complaints about unresponsive controls on retina displays, this is quite possibly the culprit.

I have filed a bug of course, and in due time I expect Unity Tech will change the threshold, or possibly something else I haven’t thought of, and all will be well.

In the meantime, I’ve got a game to ship! So, what to do?

My plan was to add my own touch-processing logic, using the same techniques I recently used to make the ScrollView control respond to finger drags.
However, I found to my dismay that most of my remaining UnityGUI menus happen to be using GUILayout, not GUI. This means that I don’t actually know where the buttons are being displayed on the screen. And without that Rect, I can’t do touch detection.

So I am faced with the choice of waiting for a possible fix, or of converting my GUILayout menus to GUI. Doing the layout myself is not rocket science, but it is tedious to rewrite the menus and retest every iPhone and iPad resolution and orientation I plan to support.

UPDATE: See the comments below. It turns out there IS a way to get the rectangle of a GUILayout control. I will post some sample code once I’ve implemented a workaround for the responsiveness issue.

UPDATE October 28, 2010: I have coded the workaround. But: I am no longer able to reproduce the original problem! Either something has changed about my test app, or I’m missing an important detail.

I wasn’t seeing widespread reports of this problem so the fact that it doesn’t always occur makes sense. In a way, a relief. But I would dearly like to know how it happened originally, and not just because it would have saved me some effort rewriting the tap logic. The effect was very specific to button presses on a retina display, and all my testers noticed it. Unfortunately without owning a retina display myself I am not going to get to the bottom of this any time soon.

Avoiding Performance Cost of OnGUI

The Unity profiler revealed recently that Pawns for iPhone was spending 5% of its time in a UnityGUI script that I didn’t need any more. Removing it from my scene was easy enough, but it got me thinking. The script looked something like this:

void OnGUI()
{
   if (showDialogBox)
   {
      // lots of code that never executed
   }
}

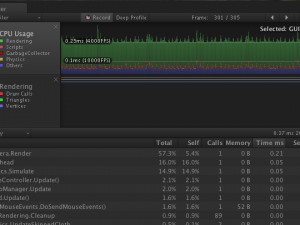
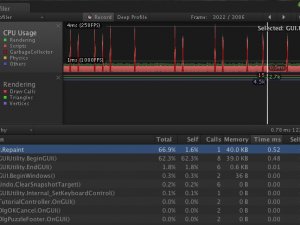
Not much going on here! So it appeared that just having OnGUI in a script was expensive. This was worth knowing because I still have three other OnGUI scripts left in the scene. Each of them exits immediately if their dialog box is not showing. So in theory they should cost nothing during actual gameplay. But the profiler told a different story:

It turns out that there are some major setup costs associated with OnGUI. GUI.Repaint is listed as taking over 65% of the CPU! Of that, most of the time is spent in GUIUtility.BeginGUI. Note that almost no time at all is spent in my three OnGUI methods (TutorialController.OnGUI, DlgOKCancel.OnGUI, and DlgPuzzleFooter.OnGUI.) So the early exit clause was working, but the damage was done before OnGUI was even called.

To verify this I disabled the three objects in the inspector while the scene was running. The new profiler results are much healthier:

GUI.Repaint has been eliminated. The time is now mostly spent on rendering, physics, and in scripts.

Since disabling the scripts solved the problem, I did the obvious thing, which was to to disable the objects with the OnGUI scripts on them until needed:

footerDlg.gameObject.active = false;

But one trick is needed to reactivate them. Search functions like Find and FindObjectOfType do not return inactive objects. Instead, you must already have a reference to the object you want to activate.

One way is to start the scene with active = true. Your script can then Find the object, store a reference to it, and then set active = false until it is needed. (This is what I did because it worked well with the code I’d already written.)

	void Awake()
	{
		// cache reference to footer dlg
		footerDlg = (DlgPuzzleFooter) GameObject.FindObjectOfType(typeof(DlgPuzzleFooter));
		if ( footerDlg == null )
		{
			Debug.Log("Error: DlgPuzzleFooter object is missing.");
		}
		else
		{
			// deactivate it until needed, for performance
			footerDlg.gameObject.active = false;
		}
        }

A second way is simply to declare a public variable for the inactive object, and then use Unity’s Inspector to set the value at design-time.

A third approach is detailed in a post on UnityAnswers. It keeps a list of every object that gets deactivated.

The fact that OnGUI looks like any other Unity method is misleading. It’s an expensive operation, even if it returns immediately without drawing anything.

UnityGUI itself is not recommended where performance is important, particularly during gameplay on an iPhone or Android device. But it is a convenient way to define menus, dialog boxes, high score lists, and other parts of the user interface. By deactivating OnGUI scripts until they are needed, you can often avoid paying much for that convenience.

Adding iPhone Touch Scrolling to a UnityGUI ScrollView

When running on the iPhone, UnityGUI ScrollViews act as if the player is using a mouse. The player can tap on or drag the scrollbar, but they can’t drag the list itself up and down with their finger. And naturally, that’s the first thing my playtester tried to do. So it would be useful to be able to add touch behavior to UnityGUI scrolling lists.
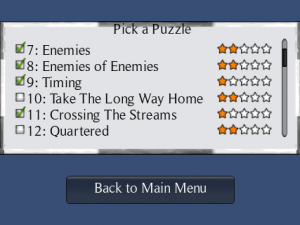

Pawns Puzzle Picker

Here’s how I did it. This article may be useful to someone porting UnityGUI code to the iPhone, or who just wants a working example of how to use the different iPhone touch phases.

(For a downloadable Unity package demonstrating everything in this post, scroll to the bottom.)

Design

The desired behaviors are:

  1. Allow the player to drag the list up and down
  2. Single-tap selects a row
  3. List has inertia, drifts to stop when the user lets go

Note that when a touch begins, we don’t yet know whether the player is starting a tap or a drag. And if they drag a short distance and then let go, did they tap that row or not? To avoid ambiguity many apps have the user press a “Done” button to confirm their selection. Other possibilities are to require a double-tap on a row, or treat it as a tap only if it is released quickly.

I decided to copy behavior I liked in Things for iPhone, which highlights the row when it is first touched. But if the user starts to drag it, the highlight disappears. So a tap can be slow as long as the finger doesn’t move. I like this because you can see what you’ve selected, and cancel it (with a short drag) if you missed your target.

Implementation

It should be possible to access touches during the OnGUI logic. I didn’t do it that way. Instead, my OnGUI code draws the scrolling list but no longer responds to clicks (although as I note below, that code can be left in for cross-platform purposes.) The code for detecting and responding to touches is now all in Update. (This is just a matter of preference, but by separating the row drawing from the code that handles input, I suspect it will be easier to replace the iPhone touch logic when porting the code to a new platform.)

1. Responding to Drags

The code for dragging the list turns out to be easy. All we need to do is detect when a touch delta has occurred. We then adjust the list’s current scroll position by the same amount.

if (touch.phase == TouchPhase.Moved)
{
    // dragging
    scrollPosition.y += touch.deltaPosition.y;
}

Depending on what controls you have in your scrolling list, you may find that the one that is being touched for the drag highlights, and stays highlighted after the player lets go. The solution is either to use a control that doesn’t behave that way (e.g. a Label instead of a Button) or to change the GUIStyle/GUISkin to make selected controls look the same as unselected.

2. Responding to Taps

Things can get a little trickier for detecting single-taps on a control in the list.

It’s tempting to keep the standard GUI click detection code in place. That can be used in some cases, but not if we want the behavior that I described above, where the row is highlighted when the touch begins, and can turn into a selection or a drag depending on if the finger moves or not.

So instead I took out the GUI click-response code and manage the taps myself. The trick here is in figuring out which row was tapped from the touch coordinates. Touch coordinates need to be adjusted as follows:

  • UnityGUI y-coordinates are inverted when compared to touch coordinates.
  • Touch coordinates need to be adjusted by the amount that the list has been scrolled.
  • UnityGUI windows and scrollframes also add offsets to the coordinates.

In my example the scrolling list is in a ScrollView, which in turn is in a Window. So the code to calculate which row a tap was on looks like this:

private int TouchToRowIndex(Vector2 touchPos)
{
    float y = Screen.height - touchPos.y;  // invert y coordinate
    y += scrollPosition.y;  // adjust for current scroll position
    y -= windowMargin.y;    // adjust for window y offset
    y -= listMargin.y;      // adjust for scrolling list offset within the window
    int irow = (int)(y / rowSize.y);
		
    irow = Mathf.Min(irow, numRows);  // they might have touched below last row
    return irow;
}

We also need to test if a tap is actually inside the scrollable list. (Again, we have to offset the list rectangle with the coordinates of the Window it is inside.)

bool IsTouchInsideList(Vector2 touchPos)
{
	Vector2 screenPos    = new Vector2(touchPos.x, Screen.height - touchPos.y);  // invert y coordinate
        Vector2 listSize     = new Vector2(windowRect.width - 2*listMargin.x, windowRect.height - 2*listMargin.y);
	Rect rAdjustedBounds = new Rect(listMargin.x + windowMargin.x, listMargin.y + windowMargin.y, listSize.x, listSize.y);

	return rAdjustedBounds.Contains(screenPos);
}

Now the code to handle drags and taps is as follows. I also added code to handle the Cancelled touch phase, which like the Moved phase cancels the selection. (Taps that are not inside the list are ignored; drags that go outside the list cancel the touch.)

fInsideList = IsTouchInsideList(touch.position);
if (touch.phase == TouchPhase.Began && fInsideList)
{
	selected = TouchToRowIndex(touch.position);
}
else if (touch.phase == TouchPhase.Canceled || !fInsideList)
{
	selected = -1;
}
else if (touch.phase == TouchPhase.Moved &&  && fInsideList)
{
	// dragging
	selected = -1;   // cancel the selection in favor of the drag
	scrollPosition.y += touch.deltaPosition.y;
}
else if (touch.phase == TouchPhase.Ended)
{
       // Was it a tap, or a drag-release?
       if ( selected > -1 )
       {
           Debug.Log("Player selected row " + selected);
       }
}

We also need to highlight the row that is being touched, at least until the player starts to drag it. I couldn’t find a documented way to tell UnityGUI to draw the next row with a different state (i.e. Hover or Focus, instead of Normal.) So instead I have a separate GUIStyle for selected rows. In the OnGUI code that draws the rows, I have the following:

       	if ( iRow == selected )
               	GUI.Button(rBtn, rowLabel, rowSelectedStyle);
       	else
       		GUI.Button(rBtn, rowLabel);

3. Inertia

When the user drags and then lets go a standard iOS scrolling list, it doesn’t stop moving immediately. We want that same effect of drifting to a stop. I do this by calculating an initial velocity when the touch ends. This moves the list for half a second, or until a new touch begins.

When the code detects that the touch has ended (TouchPhase.Ended) it stores the y-component of last touch’s deltaPosition. Dividing this by the deltaTime gives the starting velocity, which is gradually reduced to zero over the next half-second. This doesn’t have exactly the same feel that iOS lists have, but it’s very close.

Here is the code that sets up the inertia when the touch phase has just ended. It stores the time of the release and how fast the list was being scrolled at the time.

if (touch.phase == TouchPhase.Ended)
{
     // Was it a tap, or a drag-release?
     if ( selected > -1 )
     {
         Debug.Log("Player selected row " + selected);
     }
     else
     {
         // impart momentum, using last delta as the starting velocity
	 // ignore delta < 10; rounding issue can cause ultra-high velocity
	 if (Mathf.Abs(touch.deltaPosition.y) >= 10) 
	     scrollVelocity = (int)(touch.deltaPosition.y / touch.deltaTime);
	 timeTouchPhaseEnded = Time.time;
     }
}

I ran into a surprising bug where small finger movements would scroll the list extremely quickly. It turns out that a tiny movement of the finger can get rounded up to a delta of 5 pixels. This is a small amount, but given a fast framerate, this rounded amount represents a monstrously high velocity! The simple solution was for my inertia code to ignore very small movements. Less than 10 pixels seemed to work well in my tests on an iPhone 2g. (It’s possible that higher-resolution iPhones and iPads round by a different amounts.)

Here is the code that runs when there are no touches (or multiple touches, which I chose to ignore.) If the list has some leftover velocity from the last drag, it moves the list for a while longer. This uses the variables that were stored by the previous code sample.

if (Input.touchCount != 1)
{
    selected = -1; 

    if ( scrollVelocity != 0.0f )
    {
	// slow down over time
	float t = (Time.time - timeTouchPhaseEnded) / inertiaDuration;
	float frameVelocity = Mathf.Lerp(scrollVelocity, 0, t);
	scrollPosition.y += frameVelocity * Time.deltaTime;
				
	// after N seconds, we've stopped
	if (t >= inertiaDuration) scrollVelocity = 0.0f;
    }
   return;
}

Testing reveals that the list works well now. But there is a question of what to do with the original scrollbar. Dragging on it is a bit weird because it moves in the opposite direction as the list. In other words, you drag the list up to move down, but you drag the scrollbar up to move up. For Pawns I simply made the scrollbar very narrow to discourage tapping on it, but it remains as a visual cue that this is a scrollable list.

Miscellaneous

Note that if you make your controls respond only to touches, they can only be tested via UnityRemote or with an actual iPhone or iPad. So I found it useful to keep the original click logic in the OnGUI method as well. The code can be wrapped with a check to make it run only for non-iOS builds:

        if ( fClicked && Application.platform != RuntimePlatform.IPhonePlayer )
        {
           Debug.Log("Player mouse-clicked on row ");
        }

However, note that this code still runs in Unity Remote, which can lead to cases where a touch is interpreted both as touch and as a click.

One last optimization: we can reduce the number of drawcalls a lot by only drawing rows that are actually visible- a trick I blogged about earlier.

// draw call optimization: don't actually draw the row if it is not visible
// rBtn is the rectangle of the row we are about to draw
// rScrollFrame is the rectangle of the scrollview
if ( rBtn.yMax >= scrollPosition.y && 
     rBtn.yMin <= (scrollPosition.y + rScrollFrame.height) )
{
    	// ... GUI drawing commands for the current row ...
}

Demo

The following Unity 4 package (UPDATED 7/4/2013) contains sample GUI scripts that demonstrate a simple scrolling list that responds to iPhone/iPad touches. (In theory these should work on Android as well.) One script is written in C#, the other in JavaScript, but they are otherwise identical.
GUITouchScroll Package for Unity 4

Import it into your project. This will create a new folder, GUITouchScroll. Drag one of the GUITouchScroll prefabs that's in the folder into your Scene view to create the sample scrolling list-- one prefab uses the C# script, the other Javascript. The number of rows, and the window and list dimensions can be adjusted in the Inspector. The example uses the default UnityGUI skin, but this also can be replaced in the Inspector. You can also adjust the inertia, which is how quickly the list stops moving after you let go of a drag. (Fun tip: if you set inertia to 10 seconds a fast drag can leave the list bouncing up and down a few times!)
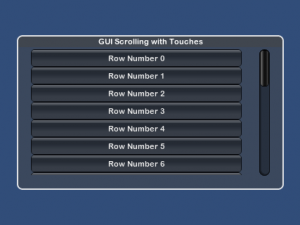
To test the scrolling and tap behavior, run the scene with Unity Remote or on an iOS device. When a row is tapped, a line of text will be output to the Unity debugging console. (Keep in mind that the scrolling will not look or feel very smooth on Unity Remote, due to the reduced frame rate.)

Important: If you are developing for Android please note that the touch events apparently work a little differently, which breaks the inertia. Please see the comments below from Ali, Greg, and Roberto for ways to fix it. My thanks to them!

(7/4/2013) I have added code to section 2 for detecting whether the touch is inside the scrolling list or not. Thanks for reporting that bug, everyone! This code has also been tested with Unity 4 now and it works without modification.
First Impressions of Unity 3

I finally got access to the Unity 3.0 preview build last weekend, and was able to spend a couple of hours with it. My goal for the session was to add a lightmap to my A Tack game. Here’s how it went.

Installation
Always rename your old Unity install folder(s) before running a new Unity installer. (This goes for all Unity upgrades, not just the Unity 3 preview.) This lets you return to old versions. For a disposable beta version this is obviously useful, but I’ve sometimes found it handy to open a project in an old version for comparison.

Obviously you should also make a backup of projects before letting Unity convert them into a new format, which Unity 3 does.

Converting the Right Project
There is a pitfall I ran into even though I had made a backup of the project I wanted to convert to Unity 3. I tried to open it, but then ran into the registration screen. Once I’d gotten past that, Unity opened and converted the last project I’d worked on instead of the one I’d just picked to open.

I imagine that it was the registering screen that caused this problem. After registering be sure to read the dialog carefully and note which project Unity is about to convert.

MonoDevelop
I have been eagerly looking forward to both the debugging and code completion features, so the first thing I did was set up Unity to use MonoDevelop. The steps to do this are:

  1. Create a MonoDevelop solution file.
  2. Open that solution in MonoDevelop, build it, then run it.
  3. (optional) In Unity’s preferences, set MonoDevelop to be the default script editor, so that opening a script doesn’t bring up Unitron.

The manual has a section on this; I also found the following video demonstration (courtesy of BergZergArcade.com) helpful:

Autocompletion and C# syntax highlighting in MonoDevelop worked well. These will save me many trips to Unity and Mono references. (I didn’t try debugging with breakpoints yet.)

Bug: unrecognized method FileInfo.OpenText
The first project I opened (unintentionally) was Pawns. I was able to build it in MonoDevelop, but the Unity IDE refused to run it, claiming that one of my scripts was using an unknown function. System.IO.FileInfo.OpenText is a perfectly legitimate method though, and I’ve been using it for months with Unity 2.6 and Unity for iPhone. (MonoDevelop’s autocomplete also thought it was legit.)

This was a showstopper unfortunately, so I closed Pawns for the time being and converted the project I’d originally intended: A Tack.

Conversion Then Repair
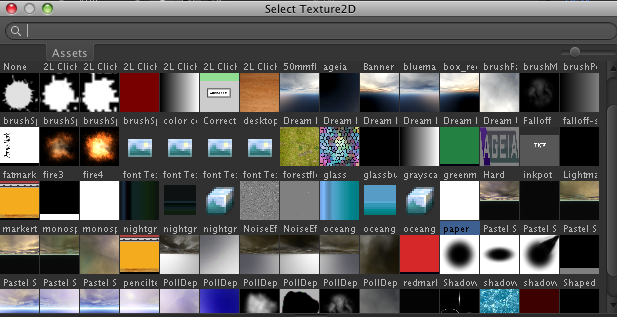
Perhaps its because I’m editing projects that were originally created with Unity 1.x and have gone through many edits and conversions since, but almost any time I convert to a newer Unity format I lose some asset assignments. This time was no exception so I spent a little while re-assigning models and scripts to objects that had lost them. This was my first exposure to the new texture picker, which makes selecting the right texture much easier:

Scalable, searchable texture picker

A Tack reads and writes pixels from some of its textures. This is a setting on the texture that defaults to off. so I had to go through my brush and paper textures to enable read/write on each. (Unity gave a helpful error message for this so there was no mystery.)

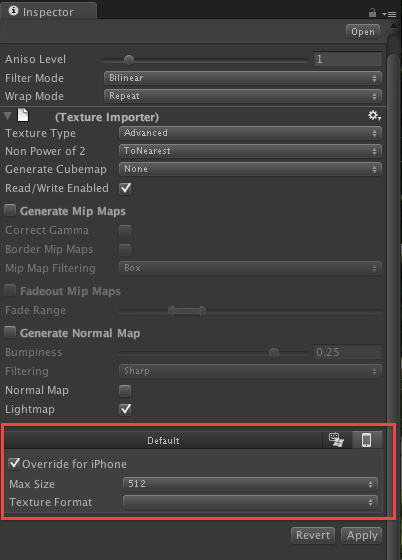
Speaking of texture settings, there are a few new import settings for textures. The settings now include support for normal maps and lightmaps, and towards the bottom there are settings that can be overridden when building for different platforms (I’m licensed for Mac/PC and iPhone, so next to the Default there are two additional icons.)

Unity 3 Preview's texture import settings

Finally it was time to try out the feature I’d been looking forward to: lightmapping.

Lightmapping
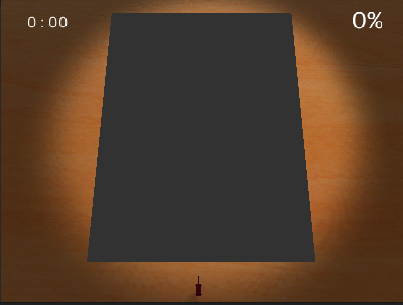
The main reason the spotlight exists in my scene is to make that nice-looking circle of light on the desk; a lightmap for the desk will let me get rid of the spotlight, saving on lighting calculations.

The steps I followed to lightmap the desk were:

  1. Toggle the lightmapping checkbox on the texture I wanted to lightmap (in this case, the desk.)
  2. Select the desk (a plane) in the scene Hierarchy view, then click on the menu Tools->Lightmapping.
  3. Select the static checkbox, then click bake.

The lightmapping calculations churned for about a minute. I then turned off the spotlight in my scene, but the lighted circle on the desk remained. Success! So simple.

Spotlight facing the desk was replaced by a lightmap

I finally called it a night when the paper object stopped reflecting any light. (Haven’t solved this one yet; it seemed to start when I tried to lightmap that texture, and nothing I’ve tried since has fixed the problem.)

Conclusions
This was a preview release, and probably not even the most current beta. I ran into pretty much the kinds of bugs and conversion issues that I expected. Some were minor; only one was a definite showstopper. So overall my impressions are positive.

I’m thrilled about the lightmapper and the use of MonoDevelop for coding and debugging. Plus there are dozens of other useful features that I haven’t played with yet. I’m feeling the same sense of excitement and discovery that I felt the first time I tried out Unity, way back in 2005.

Supporting iPhone and iPad Resolutions

I recently added a profile of my forthcoming game, Pawns for iPhone, to the website IndieDB. As I was generating screenshots I found to my dismay that I could not generate high-resolution screenshots of games in progress. The iPhone version of Pawns is currently hard-wired for iPhones in landscape mode.

I had planned all along to look into iPad and “retina display” support later on, possibly after the first release for iPhone. It never occurred to me that I would find those higher resolutions useful myself. Oops.

Even more embarrassing, the original version of Pawns supported many screen resolutions. It’s something I lost as I tuned the game for iPhone.

The original version used Unity’s GUI objects, which are always sized proportionally to the screen. To make the graphics crisper on the iPhone I had converted much of it over to UnityGUI. But pixel-correct textures come at the cost of needing to draw gui elements at every resolution that you will need them. The plan is to rebuild my gui elements at a much higher resolution and let them be scaled pretty much wherever they are used. Hopefully the result won’t be too blurry.