Category Archives: Unity3d

First Impressions of Unity 3

I finally got access to the Unity 3.0 preview build last weekend, and was able to spend a couple of hours with it. My goal for the session was to add a lightmap to my A Tack game. Here’s how it went.

Installation
Always rename your old Unity install folder(s) before running a new Unity installer. (This goes for all Unity upgrades, not just the Unity 3 preview.) This lets you return to old versions. For a disposable beta version this is obviously useful, but I’ve sometimes found it handy to open a project in an old version for comparison.

Obviously you should also make a backup of projects before letting Unity convert them into a new format, which Unity 3 does.

Converting the Right Project
There is a pitfall I ran into even though I had made a backup of the project I wanted to convert to Unity 3. I tried to open it, but then ran into the registration screen. Once I’d gotten past that, Unity opened and converted the last project I’d worked on instead of the one I’d just picked to open.

I imagine that it was the registering screen that caused this problem. After registering be sure to read the dialog carefully and note which project Unity is about to convert.

MonoDevelop
I have been eagerly looking forward to both the debugging and code completion features, so the first thing I did was set up Unity to use MonoDevelop. The steps to do this are:

  1. Create a MonoDevelop solution file.
  2. Open that solution in MonoDevelop, build it, then run it.
  3. (optional) In Unity’s preferences, set MonoDevelop to be the default script editor, so that opening a script doesn’t bring up Unitron.

The manual has a section on this; I also found the following video demonstration (courtesy of BergZergArcade.com) helpful:

Autocompletion and C# syntax highlighting in MonoDevelop worked well. These will save me many trips to Unity and Mono references. (I didn’t try debugging with breakpoints yet.)

Bug: unrecognized method FileInfo.OpenText
The first project I opened (unintentionally) was Pawns. I was able to build it in MonoDevelop, but the Unity IDE refused to run it, claiming that one of my scripts was using an unknown function. System.IO.FileInfo.OpenText is a perfectly legitimate method though, and I’ve been using it for months with Unity 2.6 and Unity for iPhone. (MonoDevelop’s autocomplete also thought it was legit.)

This was a showstopper unfortunately, so I closed Pawns for the time being and converted the project I’d originally intended: A Tack.

Conversion Then Repair
Perhaps its because I’m editing projects that were originally created with Unity 1.x and have gone through many edits and conversions since, but almost any time I convert to a newer Unity format I lose some asset assignments. This time was no exception so I spent a little while re-assigning models and scripts to objects that had lost them. This was my first exposure to the new texture picker, which makes selecting the right texture much easier:
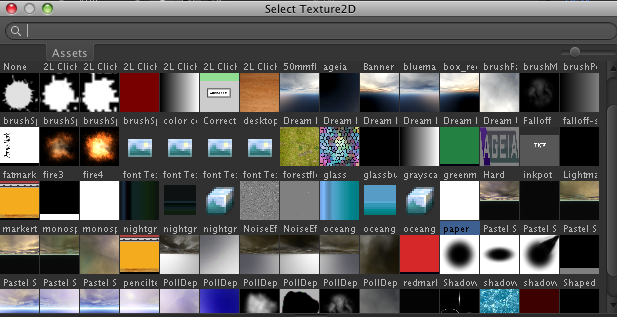
Scalable, searchable texture picker

A Tack reads and writes pixels from some of its textures. This is a setting on the texture that defaults to off. so I had to go through my brush and paper textures to enable read/write on each. (Unity gave a helpful error message for this so there was no mystery.)

Speaking of texture settings, there are a few new import settings for textures. The settings now include support for normal maps and lightmaps, and towards the bottom there are settings that can be overridden when building for different platforms (I’m licensed for Mac/PC and iPhone, so next to the Default there are two additional icons.)
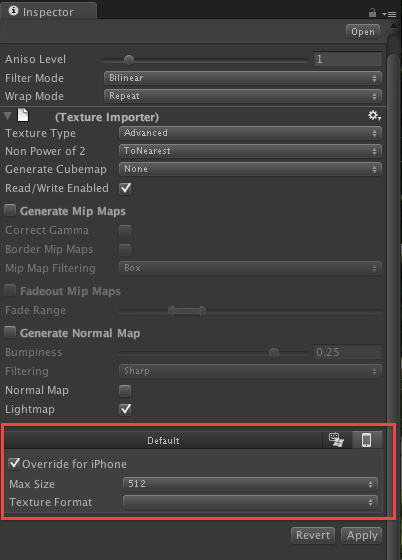
Unity 3 Preview's texture import settings

Finally it was time to try out the feature I’d been looking forward to: lightmapping.

Lightmapping
The main reason the spotlight exists in my scene is to make that nice-looking circle of light on the desk; a lightmap for the desk will let me get rid of the spotlight, saving on lighting calculations.

The steps I followed to lightmap the desk were:

  1. Toggle the lightmapping checkbox on the texture I wanted to lightmap (in this case, the desk.)
  2. Select the desk (a plane) in the scene Hierarchy view, then click on the menu Tools->Lightmapping.
  3. Select the static checkbox, then click bake.

The lightmapping calculations churned for about a minute. I then turned off the spotlight in my scene, but the lighted circle on the desk remained. Success! So simple.
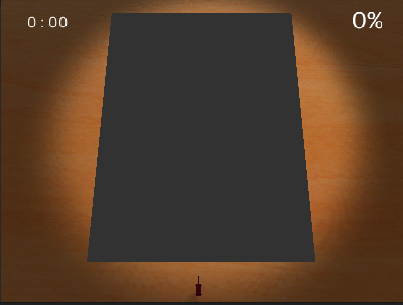
Spotlight facing the desk was replaced by a lightmap

I finally called it a night when the paper object stopped reflecting any light. (Haven’t solved this one yet; it seemed to start when I tried to lightmap that texture, and nothing I’ve tried since has fixed the problem.)

Conclusions
This was a preview release, and probably not even the most current beta. I ran into pretty much the kinds of bugs and conversion issues that I expected. Some were minor; only one was a definite showstopper. So overall my impressions are positive.

I’m thrilled about the lightmapper and the use of MonoDevelop for coding and debugging. Plus there are dozens of other useful features that I haven’t played with yet. I’m feeling the same sense of excitement and discovery that I felt the first time I tried out Unity, way back in 2005.
Supporting iPhone and iPad Resolutions

I recently added a profile of my forthcoming game, Pawns for iPhone, to the website IndieDB. As I was generating screenshots I found to my dismay that I could not generate high-resolution screenshots of games in progress. The iPhone version of Pawns is currently hard-wired for iPhones in landscape mode.

I had planned all along to look into iPad and “retina display” support later on, possibly after the first release for iPhone. It never occurred to me that I would find those higher resolutions useful myself. Oops.

Even more embarrassing, the original version of Pawns supported many screen resolutions. It’s something I lost as I tuned the game for iPhone.

The original version used Unity’s GUI objects, which are always sized proportionally to the screen. To make the graphics crisper on the iPhone I had converted much of it over to UnityGUI. But pixel-correct textures come at the cost of needing to draw gui elements at every resolution that you will need them. The plan is to rebuild my gui elements at a much higher resolution and let them be scaled pretty much wherever they are used. Hopefully the result won’t be too blurry.

Isometric vs Perspective Camera

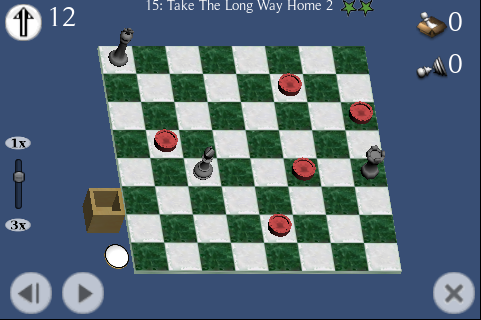
Recently I’ve been experimenting with using an isometric camera for Pawns for the iPhone.

Isometric views have always felt a little cheesy to me, for historical reasons. In the old days it was often used to fake 3D. Since things don’t get smaller as they move further away from an isometric viewpoint, you could use 2D sprites instead of drawing true 3D objects. This was useful when the graphics hardware was only good at drawing sprites. (For example, old arcade games like Q*Bert or Zaxxon painted their 3D graphics this way.)

The iPhone is of course perfectly capable of rendering true 3D. And with Unity I don’t gain any speed just by switching to a isometric view. Even so, the isometric view has a few advantages.

Firstly, the squares near the rear of the board are the same size as those in front, making it easier for the player to place arrows. Pieces in the back are also more visible this way.

I can also optimize the appearance of the 3D pieces. Under perspective it’s hard to make out the crosspiece on top of the king, for example, depending on the angle. In an isometric view the king’s rotation relative to the camera is always the same, whether it is on the left side of the board or the right. So each model only needs to look good from one angle.

This isn’t just a matter of aesthetics, or covering up my mediocre artistic skills. Pawns will not be fun on the iPhone unless each type of piece is instantly recognizable despite the small screen.

For that matter, with care I could improve the graphics by prerendering high-resolution chess models to make 2D sprites. This might improve their appearance- I’ve been having wrestling with lowering the polygon counts without having the pieces look too crappy. (A topic for a future blog entry, perhaps.)

Of course, if I go to billboarded sprites I can’t simply reposition the camera or lights whenever I feel like. And after seeing Pawns in perspective for so many years, I’m having a hard time getting used to the isometric look. Still, I’ll leave it this way for a while longer and see if it grows on me.

Reducing UnityGUI Draw Calls

When trying to improve the performance of a Unity iPhone game, time spent reducing the number of draw calls is usually time well spent.

Unfortunately one of the big draw call “hogs” is UnityGUI. A useful guideline is to only use UnityGUI for game menus and option screens where framerate isn’t important. For in-game controls such as a HUD, developers resort to other methods. Alternatives include GUITextures, SpriteManager, or its commercial sibling SpriteManager 2.

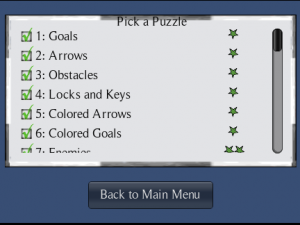
However, other tricks are sometimes possible, and I found an especially easy way to speed up a ScrollView. My game Pawns has a scrolling list that allows the player to pick a puzzle:

Pawns puzzle picker

Pawns puzzle picker

I used UnityGUI for it, and since the game is not actually being played on this scene I was hoping it would be fast enough. However, the screen was unusably slow on my iPhone, and number of draw calls reported by Unity was 165! So a serious rewrite or redesign appeared to be needed.

The structure of my puzzle picker is a Gui.Window for the frame, containing a Gui.Scrollview. Inside of the scrolling view, I loop through the list of puzzles and paint the three elements that make up each line (a checkbox, text for the puzzle name, and a texture displaying the difficulty rating.) The code looks something like this:

scrollPosition = GUI.BeginScrollView (rScrollFrame, scrollPosition, rList, false, false);

for (int iPuzzle = Puzzles.GetFirstPuzzle(), numPuz = 1;
      iPuzzle >= 0;
      iPuzzle = Puzzles.GetNextPuzzle(iPuzzle), numPuz++)
{
    int difficulty = Puzzles.GetPuzzleDifficulty(iPuzzle)-1;
    if ( GUI.Button(rCheckbox, texSolved, checkboxStyle) ||
         GUI.Button(rBtn, Puzzles.GetPuzzleName(iPuzzle), puzzleButtonStyle) ||
         GUI.Button(rDifficulty, ratings[difficulty], puzzleButtonStyle) )
    {
        // Code to jump to the selected puzzle goes here...
    }

    // set up rectangles for the next line
    rBtn.y += lineHeight;
    rTexture.y += lineHeight;
    rDifficulty.y += lineHeight;
}
GUI.EndScrollView();

Each GUI element causes a draw call. (If you are using GUILayout instead of the GUI class, then double that.) The more puzzles in my list, the more draw calls.

For the total number to be as high as 165, even the lines which are currently scrolled off the screen are generating draw calls. On my screen if the player can’t see a line they can’t tap on it, and no code depends on them. In fact, I don’t need to draw them at all. If I was using GUILayout then I wouldn’t know the position of each element, but I’m using GUI, which requires me to position each element myself.

So it turns out it’s a simple matter to skip GUI elements that are not visible. You simply test the rectangle of each control before drawing it. In my case all scrolling is vertical, and the elements are arranged in lines, so I can skip entire lines by testing if either the top or bottom of each line is visible.

The code now looks something like this. Note the line marked *NEW*:

scrollPosition = GUI.BeginScrollView (rScrollFrame, scrollPosition, rList, false, false);

for (int iPuzzle = Puzzles.GetFirstPuzzle(), numPuz = 1;
      iPuzzle >= 0;
      iPuzzle = Puzzles.GetNextPuzzle(iPuzzle), numPuz++)
{
    // *NEW* don't actually draw the controls if this line's rectangle is not visible
    if ( rBtn.yMin >= scrollPosition.y && rBtn.yMax <= scrollPosition.y + rScrollFrame.height )
    {
        int difficulty = Puzzles.GetPuzzleDifficulty(iPuzzle)-1;
        if ( GUI.Button(rCheckbox, texSolved, checkboxStyle) ||
             GUI.Button(rBtn, Puzzles.GetPuzzleName(iPuzzle), puzzleButtonStyle) ||
             GUI.Button(rDifficulty, ratings[difficulty], puzzleButtonStyle) )
        {
            // Code to jump to the selected puzzle goes here...
        }
    }

    // set up rectangles for the next line
    rBtn.y += lineHeight;
    rTexture.y += lineHeight;
    rDifficulty.y += lineHeight;
}
GUI.EndScrollView();

This worked well; only 6 or 7 lines are ever visible at a time, so the draw calls now hovers around 27 no matter how puzzles are in the list. The screen is now usable on my iPhone, though I should probably cut the number of draw calls a little further.

Obviously not everyone will happen to be using ScrollViews so I'll mention a few general approaches to improve UnityGUI's performance:

  • Combine elements/textures. For example, if I painted each line with a single texture instead of three separate elements, that would cut the draw calls by two-thirds. I could go further and paint multiple lines, even entire pages in one texture.
  • Avoid GuiLayout. If you don't use GuiLayout at all, and your GUI script sets
    [code language="csharp"]useGUILayout = false;[/code] early, such as in the Awake method, then the number of UnityGUI draw calls will be cut in half.
  • Redesign. For my example I could have abandoned the scrolling interface and replaced it with page-up/page-down buttons.

I will probably need to try out alternatives such as GUITexture or SpriteManager to speed up my main game screen, so I may have more to say about them at a later date.

Reading Text Data Into A Unity Game

Unity’s rapid edit-compile-test cycle encourages developers to build game levels interactively in the editor. Game parameters are often saved directly in the scene, or on prefabs. However, sometimes it makes sense to read that data from a file at run-time.

For example: Pawns puzzles are defined by a simple arrangement of game elements on a grid. By putting this information in a text file, I was able to try changes to the puzzles without leaving the game. Even better, by giving public access to the file I have the option to allow other people to mod the game (i.e. make their own puzzles) even if they don’t have Unity or the Pawns source code!

Below I post the code for the two techniques I used to read text files into Pawns. I also cover some of the differences to be aware of when loading data on different platforms.

Method 1: Read a text file embedded in the game’s resources
The simplest technique is to read a file that Unity has compiled into your game, just as it does for the other game assets like textures, sounds, and models. This is simple because Unity encrypts the file into your game bundle automatically. However the file is not visible to would-be-level editors, so you lose some of the advantages I talked about earlier. But if you want to avoid exposing the file’s contents to the public in a shipping game, this may be just the thing.

Place the textfile (in this example, “puzzles.txt”) in the Resources folder of your Unity project. Unity will automatically package it into your game. To read it, your script just uses Unity’s built-in Resources class:

FileInfo theSourceFile = null;
StringReader reader = null; 

TextAsset puzdata = (TextAsset)Resources.Load("puzzles", typeof(TextAsset));
// puzdata.text is a string containing the whole file. To read it line-by-line:
reader = new StringReader(puzdata.text);
if ( reader == null )
{
   Debug.Log("puzzles.txt not found or not readable");
}
else
{
   // Read each line from the file
   while ( (string txt = reader.ReadLine()) != null )
      Debug.Log("-->" + txt);
}

Method 2: Read unencrypted text file bundled with the game
This example reads text from a file that sits alongside other files of your compiled game. Anyone can see and edit the file, which makes it convenient for making changes without having to rebuild your game. The complication is that you have to remember to include the file with your game, either by manually adding it after every build, or by creating a Unity build post-processing script to do it for you.

The following example reads a file called “puzzles.txt” from the game’s data folder as pointed to by Application.dataPath. This location varies depending on where your game is running:

Where game is running Application.dataPath
In the Unity editor project’s Assets folder
Mac build ‘Contents’ folder in the package (right-click on the game, select “View Package Contents”)
Windows build Data subfolder
iPhone app In app’s writeable Documents directory; see comments below
Webplayer build URL to webplayer’s data folder; use WWW class to access

(Since Application.dataPath returns a URL for webplayers, the following code will probably not work for them. You would have to use the WWW class instead.)

FileInfo theSourceFile = null;
StreamReader reader = null;

theSourceFile = new FileInfo (Application.dataPath + "/puzzles.txt");
if ( theSourceFile != null && theSourceFile.Exists )
   reader = theSourceFile.OpenText();

if ( reader == null )
{
   Debug.Log("puzzles.txt not found or not readable");
}
else
{
// Read each line from the file
   while ( (string txt = reader.ReadLine()) != null )
      Debug.Log("-->" + txt);
}

Method 1+2: Read from plain text file, with fallback to embedded resource
Pawns originally used method 2 exclusively, but since I plan to charge for the full set of puzzles I’d prefer not to have the final puzzle file exposed for all to see. On the other hand, I’d still like to have the ability to try out new puzzles occasionally, or allow others to design puzzles. A simple solution is to first look for the plain text file using method 2; if not found, load the default puzzles embedded in the game resources (method 1.)

In fact, since StringReader (used to read lines from the embedded text resource) and StreamReader (used to read the plain text file) are both subclasses of TextReader, once either file is opened the rest of the code can parse it without caring whether it’s reading from a file or an in-memory string:

FileInfo theSourceFile = null;
TextReader reader = null;  // NOTE: TextReader, superclass of StreamReader and StringReader

// Read from plain text file if it exists
theSourceFile = new FileInfo (Application.dataPath + "/puzzles.txt");
if ( theSourceFile != null && theSourceFile.Exists )
{
   reader = theSourceFile.OpenText();  // returns StreamReader
}
else
{
   // try to read from Resources instead
   TextAsset puzdata = (TextAsset)Resources.Load("puzzles", typeof(TextAsset));
   reader = new StringReader(puzdata.text);  // returns StringReader
}
if ( reader == null )
{
   Debug.Log("puzzles.txt not found or not readable");
}
else
{
   // Read each line from the file/resource
   while ( (string txt = reader.ReadLine()) != null )
   Debug.Log("-->" + txt);
}

Parsing XML in Unity
People often use XML as a convenient text file format, and the Mono libraries contain powerful classes for parsing it. So this would seem to be a natural fit for Unity. But using those functions requires additional Mono libraries to be bundled with your game. You should particularly avoid this when building a webplayer or iPhone app. See the Unity documentation for details.

Fortunately most tasks only require a small subset of the XML standard, so writing or borrowing a simple parser is an alternative. I found some alternatives being discussed in the Unity forums here.

To use the Mono libraries to read and write XML, this article seems to cover the topic nicely.

Accessing text files on the iPhone
As mentioned above, iPhone apps each have a writeable Documents directory. The contents of this directory are preserved when the app is updated. However, that directory starts off empty and there is no way to install a file directly into that directory along with your app. The workaround is for your game to create whatever files it needs the first time it is run.

The following code was posted in the Unity3d forums (and I’ve seen it elsewhere) for finding the location of the writeable Documents directory:

string docsPath = Application.dataPath.Replace("/Data", "/Documents/");

However, I imagine this may change in the future. Application.dataPath is a bit strange with Unity iPhone 1.5.1 in that it does not appear to point directly to a usable directory. To read from the Documents directory you need to use the above code. To read asset bundles you need to replace “Data” with “myappname.app/Data”. If the folks at Unity Technologies ever decide to fix Application.dataPath to point directly to the Data directory in a future release of Unity iPhone, the code for finding the Documents directory would need to be updated. (Or perhaps they will also add a method like Application.documentPath as well.) [3/6/2010: Unity 1.6 for iPhone was just released, and I see in the release notes that they have added the application name to the Data directory, just as I predicted. So the code sample above needs adjusting- the application name will also need to be removed from the path.]

Unity Pro only: asset bundles
Developers of webplayers and online games should also look into asset bundles, a Unity Pro feature that lets you collect game objects into a file ahead of time, and then load them at run time from a local file or from a web server.

Comments and corrections welcome. Did you find an error? Did you have a particularly interesting use for runtime data in your game? I’d be interested to know.